
oh, the places she'll go...quilt tutorial (sort of)
Here it is...baby relish's birthday quilt and a "sort of" tutorial...


When I first started quilting not too long ago, my first quilt was for my oldest who is now 2 1/2. Her favorite book was and still is Brown Bear, Brown Bear, What do you See? I made her a quilt using those fabrics from Robert Kaufman.
 (sorry for the terrible picture)
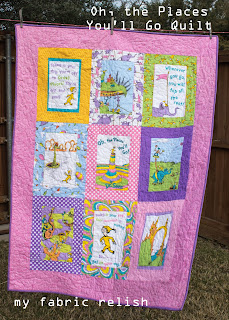
So when I was deciding what book I wanted to do baby relish's quilt in, I was sold once I laid eyes on the Oh, the Places You'll Go in the rainbow palette. Isn't it so adorable?! I ordered my fat quarter bundle for $31.99 at Fat Quarter Shop and it was more than plenty to get the quilt finished. I did use fabrics from Hobby Lobby for the binding and outside boarder. I even have extra scraps to make a wall bunting and other decorations for her room or birthday party (which will be story time/library theme).
Fabric Requirements:
1. This fat quarter set from Fat Quarter Shop or 9 Fat Quarters and one book page panel (each page is 7x11 inches)
2. 1/2 yard for outside boarder
3. 1/2 yard for binding
4. 1/2 yard for bunting binding
5. Backing fabric - This depends what on how wide you buy. See quilt measurement below to determine.
Finished quilt measure 53 x 41 inches before washed and dried
This fat quarter bundle comes with 9 fat quarters and then the book page panel with 10 book pages. I only used 9 of them. I cut each page out which measures 7 x 11 inches exactly. I then cut two, 2 1/2 inch strips from each fat quarter (fq). So, 9 book pages and two strips for each page as boarder. Still following me? Hopefully the fat quarter was cut accurately or generously and you are able to scrape by with just the two strips from each fq. If not, you might have to cut an additional strip. No worries if you do, because there is still plenty left for the bunting on back.
I sewed the strips (doing long sides first) on each page then arranged them on the floor to decide placement. Then sewed them all together.
I then added a 4 1/2 inch boarder. The front is now finished. Wasn't that simple? You can easily stop here and use the rest of the fabric for a scrappy backing. I really wanted to do a bunting quilt and decided to do it on the back of this one.


Now, for cutting the fabric for the back. My flags measure 7 inches at the top. I first cut one, 7 inch strip from each of the remaining fq pieces. I trimmed off the selvage and then measured 3 1/2 inches from the bottom end and marked. Next, you will make your second cut from the bottom to the top at the 7 in mark. Place your marks where the X's are in the picture below.

I was able to make 5 bunting flags from each strip.
I measured out the backing fabric about 3 inches larger on each side than what I needed based on the size of the front of the quilt. To arrange the flags, I used my disappearing ink marker and made the guide lines for the bunting "string" and used basting spray to adhere them to the fabric. I also attached them with a basting pin just in case. I attached each flag using a zig-zag stich but only on the sides and not the top. I then applied 1/2 inch bias tape on the top to cover the raw edges. You can make this or buy it at the store. I did a double fold but wished I just did a single fold for bulk purposes. So, if you make or buy, I recommend single fold. I used approximately 4 yards and I made extra bias tape to make bunting for her room and the party. I will post pictures later :).


I was back and forth with how I was going to quilt this and was worried about the extra layers on the back causing snags, but I am really glad I went with stippling...if that is what you want to call my version...Haha!


I hope my "sort of" tutorial was helpful. Please let me know if you have any questions or if anything is confusing. Hopefully my pictures help :)
Please leave a comment if you like...they truly make my day!
Melissa


When I first started quilting not too long ago, my first quilt was for my oldest who is now 2 1/2. Her favorite book was and still is Brown Bear, Brown Bear, What do you See? I made her a quilt using those fabrics from Robert Kaufman.
 (sorry for the terrible picture)
So when I was deciding what book I wanted to do baby relish's quilt in, I was sold once I laid eyes on the Oh, the Places You'll Go in the rainbow palette. Isn't it so adorable?! I ordered my fat quarter bundle for $31.99 at Fat Quarter Shop and it was more than plenty to get the quilt finished. I did use fabrics from Hobby Lobby for the binding and outside boarder. I even have extra scraps to make a wall bunting and other decorations for her room or birthday party (which will be story time/library theme).
Fabric Requirements:
1. This fat quarter set from Fat Quarter Shop or 9 Fat Quarters and one book page panel (each page is 7x11 inches)
2. 1/2 yard for outside boarder
3. 1/2 yard for binding
4. 1/2 yard for bunting binding
5. Backing fabric - This depends what on how wide you buy. See quilt measurement below to determine.
Finished quilt measure 53 x 41 inches before washed and dried
This fat quarter bundle comes with 9 fat quarters and then the book page panel with 10 book pages. I only used 9 of them. I cut each page out which measures 7 x 11 inches exactly. I then cut two, 2 1/2 inch strips from each fat quarter (fq). So, 9 book pages and two strips for each page as boarder. Still following me? Hopefully the fat quarter was cut accurately or generously and you are able to scrape by with just the two strips from each fq. If not, you might have to cut an additional strip. No worries if you do, because there is still plenty left for the bunting on back.
I sewed the strips (doing long sides first) on each page then arranged them on the floor to decide placement. Then sewed them all together.
I then added a 4 1/2 inch boarder. The front is now finished. Wasn't that simple? You can easily stop here and use the rest of the fabric for a scrappy backing. I really wanted to do a bunting quilt and decided to do it on the back of this one.


Now, for cutting the fabric for the back. My flags measure 7 inches at the top. I first cut one, 7 inch strip from each of the remaining fq pieces. I trimmed off the selvage and then measured 3 1/2 inches from the bottom end and marked. Next, you will make your second cut from the bottom to the top at the 7 in mark. Place your marks where the X's are in the picture below.

I was able to make 5 bunting flags from each strip.
I measured out the backing fabric about 3 inches larger on each side than what I needed based on the size of the front of the quilt. To arrange the flags, I used my disappearing ink marker and made the guide lines for the bunting "string" and used basting spray to adhere them to the fabric. I also attached them with a basting pin just in case. I attached each flag using a zig-zag stich but only on the sides and not the top. I then applied 1/2 inch bias tape on the top to cover the raw edges. You can make this or buy it at the store. I did a double fold but wished I just did a single fold for bulk purposes. So, if you make or buy, I recommend single fold. I used approximately 4 yards and I made extra bias tape to make bunting for her room and the party. I will post pictures later :).


I was back and forth with how I was going to quilt this and was worried about the extra layers on the back causing snags, but I am really glad I went with stippling...if that is what you want to call my version...Haha!


I hope my "sort of" tutorial was helpful. Please let me know if you have any questions or if anything is confusing. Hopefully my pictures help :)
Please leave a comment if you like...they truly make my day!
Melissa


Darling!
ReplyDelete